Role playing as a system administrator
Table of contents
How it all started
This all started when I found a free laptop while biking. It was a gaming laptop from 2013 with a 3rd generation 4 core Intel processor(with hyperthreading) and 8GB of DDR3 PC3-12800 RAM in a dual channel configuration. The first thing I did was take it apart and clean the insides. This was a while ago, so I don’t remember exact details. I only know it was dusty and had dry thermal paste. I used Arctic MX4 and repasted the CPU and GPU. Next, I installed Ubuntu Server 20.04 LTS. Unfortunately, I didn’t document everything online, but I will attempt to catch you up on this blog.
THE CLOUD IS JUST SOMEONE ELSE’S COMPUTER!!
Somehow I was able to signup for Oracle Cloud Free Tier. After a bunch of failed attempts, switching networks was my solution to signing up. wink wink hint to those that are strugging to signup. I decided to spin up one AMD instance. In the free tier, you get access to 2 AMD x86 instances and a A1 arm based vps. You can spin up as many A1 instances, but you must be within the 200GB storage, 24GB ram, and 4 CPU limit. If you stay within these limits, in theory, its free forever. Only time will tell, but lets hope my account doesn’t get suspended for no reason. We do not own the infrastructure, so don’t store any sensitive information on there. If you can, encrypt the data at rest with a symmetric key that you generated independantly of the cloud provider. The first thing you should do is ensure you can use the cloud console in case you get locked out. I’ve had this happen when I accidently broke firewall rules on the machine. Since I didn’t set a password, I couldn’t login as the Ubuntu user. And yes I tried using SSH keys, but that didn’t work. Here are the steps:
- SSH into your machine
sudo passwd <user>(ubuntu is default) and set a password for the user- Login to console
- Go to Compute -> Instances and select the machine
- On the left panel click
Console connection - Click
Launch Cloud Shell connection - Wait for the prompt and attempt to login.
- If it works, great! You now have a out of band shell connection in case you break something.
Note: You might need to press enter for the login prompt to show.
Free tier allows up to 3 IPv6 /64 prefix per subnet. To get IPv6 connectivity, you first need to allocate an oracle IPv6 prefix, then assign an IP address to the machine attached to the VNIC. Here are the steps:
- Go to Networking -> Virtual Cloud Networks and select the correct VCN.
- Select the correct subnet.
- On the left, select
IPv6 Prefixesand clickAdd IPv6 Prefix - Tick
Assign an Oracle allocated IPv6 /64 prefix.and clickAdd IPv6 Prefix - On the left, select
Route Tablesand click on the default entry. Add Route Rules, Protocol Version:IPv6, Target Type:Internet Gateway, Destination CIDR Block:::/0, clickAdd Route RulesSecurity Lists, create a new security list, add egress rule withAll Protocolsand destination::/0- Go back to Compute -> Instances, select the machine attached to that VNIC, on the left:
Attached VNICs, select default VNIC - On the left:
IPv6 Addresses,Assign IPv6 Address, select the default prefix, clickAssign - SSH into machine and run
dhclient -6 - Run
ifconfigand check if you have a /128 IPv6 address. Confirm usingping -6 example.org
If you want inbound rules for IPv6, you must add them to the security list, but with source as ::/0 instead of 0.0.0.0/0. Of course customize the source if you want to perform source filtering. Remember to open any ports, you must do it through the console, don’t use iptables or nftables on the machine, it won’t work. Why? Your machine is actually behind a NAT. If you look at ifconfig, notice how your primary NIC has a private address. This is just like port forwarding on your router at home.
DIY Router
Using a Dell Optiplex SFF I obtained from the university, I installed Proxmox, which is a virtualization environment. This allows me to run LXC and virtual machines. I wanted to replace my trash ISP router as it was quite limiting. I wanted more control over my equipment and network routing. Installing PFsense was quite easy, simply download the ISO file using Proxmox and install it. I bought a Intel dual port gigabit NIC off of eBay for around 20CAD. What I love about these Dell Optiplex’s is how easy it is to install or remove hardware. You take the front panel off, pop out the PCIE cover, put the network card in, and close everything up. A bit easier said than done, do be careful when removing the PCIE metal bracket as its quite sharp, you don’t want to cut your finger open.
Intrusion detection and prevention
I am opening ports in the firewall, so its important to use an intrusion detection and prevention system to stop potential attacks. I admit that I am not a big target(yet), but I think learning Suricata is still important. Installing Suricata in pfSense is pretty easy, simply use the package manager. Its important to first run Suricata in IDS only mode to ensure that you don’t start blocking legitimate traffic. Unfortunately, encrypted transports such as TLS and QUIC are pretty much the standard now, so there will be false positives. This is the reason why most workplaces use a technique called HTTPS inspection. I’m not a fan of this technique as it breaks the fundamental concept of encryption. Anyways lets not talk about that now.
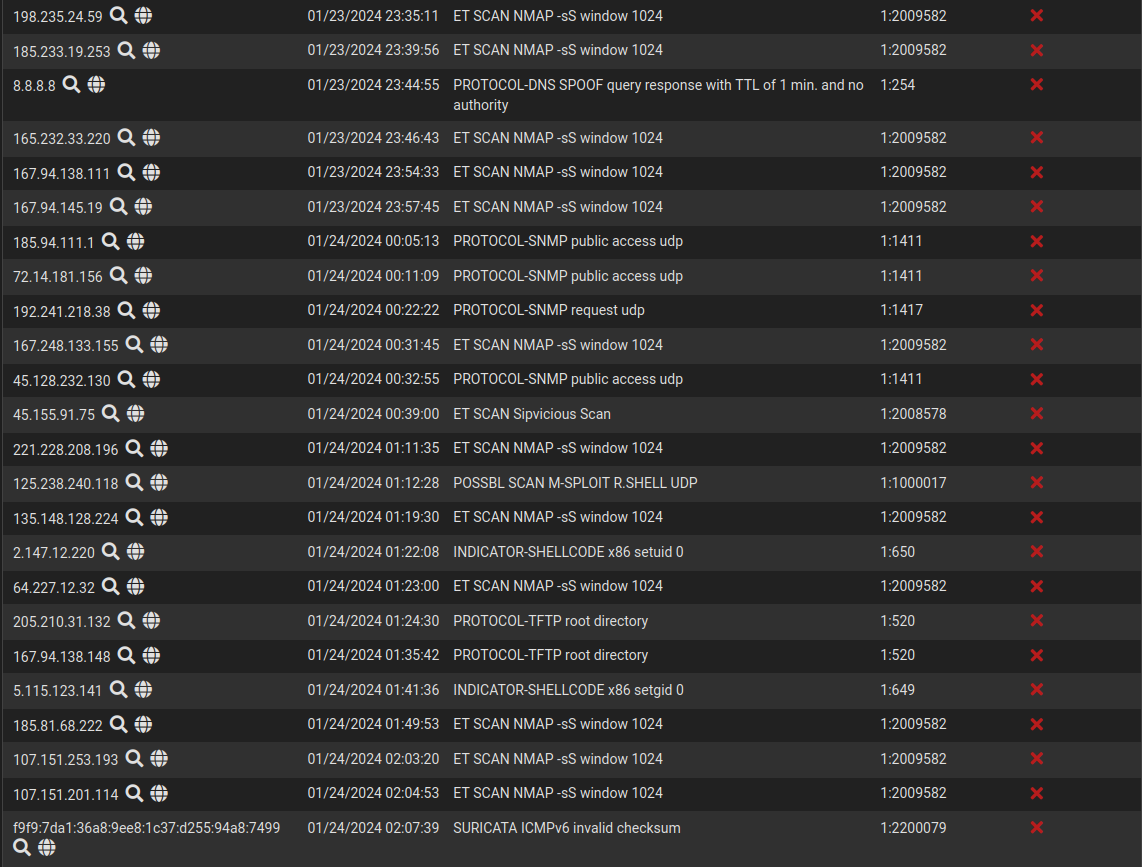
Suricata is enabled on the WAN interface. I’m only interested in Out > In traffic. As you can see, the majority of blocked IPs are port scanners. The blocked 8.8.8.8 Google DNS server is fine because I run my own recursive DNS server at home, which allows me to setup internal DNS and customize minimum TTLs. There were a couple of false positives as shown below:
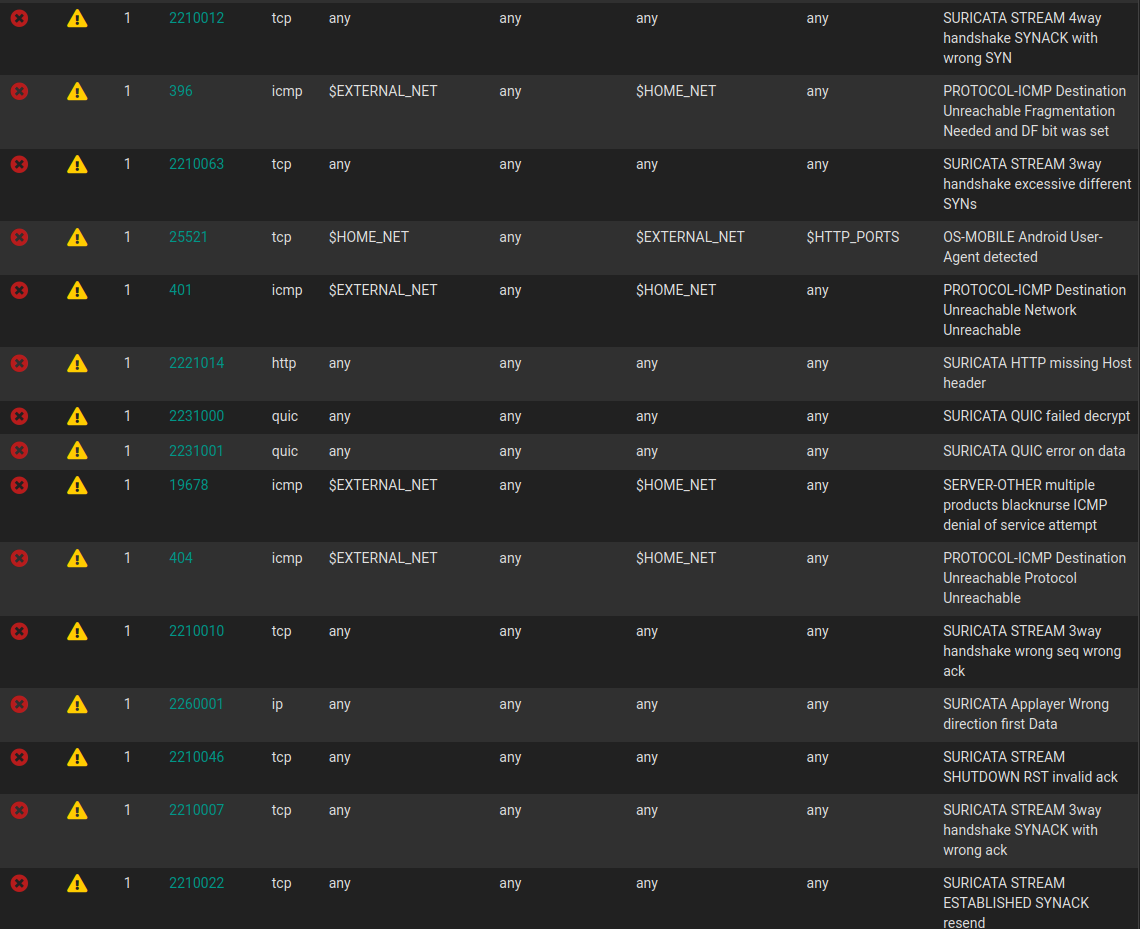
I actually was blocked by my own firewall twice. I couldn’t VPN in because my computer apparently sent a 3 way handshake with wrong ack. Although I ran Suricata in IDS only mode for 12 hours and disabled over 40 rules, there is always that one rule that I miss. This shows how tuning Suricata is continuous thing, you never set it and leave it. I also need to thank my mobile data connection, which provided an unblocked backup IP in case I was locked out. Fast forward a couple months, I needed to perform layer 7 filtering of HTTP and TLS traffic. AS you know, I hate analytics and tracking. Some mobile and IoT devices I have in my house use hardcoded IPs to connect to their analytic servers. This bypasses all DNS filtering since well there is no DNS lookup in the first place. Of course I could use Squid transparent proxy, but I already had Suricata setup so lets just use it for now.
Writing rules for Suricata is not too complicated. Look at their documentation here. First step is to figure out how to block a TLS handshake with a forbidden SNI. Suricata has a built in keyword to extract SNI called tls.sni.
alert tls any any -> any any (msg:"Block forbidden SNI"; \
  tls.sni; \
  content:"banned.sni"; \
  sid:100000;)
And for HTTP, just look at the host header.
alert http any any -> any any (msg:"Block forbidden host"; \
  http.host; \
  content:"banned.url"; \
  sid:100000;)
Now what if I had a million domains I needed to filter on HTTP and TLS. Of course I could just make a million rules for HTTP and a million rules for TLS, but that would be extremely inefficient. Suricata would spend ages looking at all the rules and my network performance would probably grind to a halt. Thankfully, Suricata provides datasets. You can encode tons of information into base64 or any other format it supports and Suricata does a very fast lookup. Now I just need 2 rules, one for TLS and one for HTTP. GREAT! The issue is Suricata on pfSense doesn’t support datasets natively. The most important part is generating the dataset from blocklists found on the internet. Most of these blocklists contain one line per domain. I can write a basic bash script to read each line and append it to a new file. Here is my first implementation:
domains=$(curl -s "https://raw.githubusercontent.com/...")
rm $rulePath #delete old rules

for url in $domains; do
    echo -n $url | base64 >> $rulePath
done
IMPORTANT: -n is mandatory!!!! By default echo makes a newline. This interferes with the » append and Suricata will not read the rule correctly. I spent way too much time troubleshooting this.
Now this worked, however it just took way too long. A million domains took over 5 minutes to complete. Of course for a background script it wasn’t a problem, but I looked at the CPU usage. The base64 command was taking up 200% of the CPU? So 2 cores fully dedicated to encoding the domains. Yes I tried echo -n domains | base64 >> $rulePath, without for loop, but it doesn’t encode the data correctly. After a couple hours, I decided to try Python’s base64 library to see if it would encode a million domains all in one shot without a loop. Here is my implementation:
import base64
import sys

def encode_lines(lines):
    return map(lambda line: base64.b64encode(line.encode()).decode(), lines)

input_data = sys.stdin.read().strip().splitlines()
encoded_data = encode_lines(input_data)
sys.stdout.write("\n".join(encoded_data) + "\n")
My plan is to parse the domain list in bash, send the entire list to Python, and have Python write it to the dataset file. First, I read from stdin, remove leading and trailing whitespaces, seperate all newlines. Take all that data and feed it to a lambda function. The map is important as it creates an iterator for the entire list. For every line, it encodes the string as base64. We must call .decode() or else the output will be in binary, not what we want. Then we write all the data to stdout with newlines.
Exposing your homelab to the internet
The best answer is: You don’t. However, that isn’t really the answer many people want to hear. It is possible to “safely” expose your homelab. The first technique is VPN. You setup a OpenVPN or Wireguard server on your LAN and open a single port on the firewall. This allows you to access everything through an encrypted tunnel. Now VPNs are supposed to be used like this, not some BS third party server on the internet thats promoted by YouTube influencers(not related, but the Honey scam lol) that have no clue what they are talking about. Since the outer tunnel is encrypted, whatever you send through can be in the clear. This is the best if you are a single user accessing your homelab. Now what if you have a couple friends and family members that want external access? Not gonna be practical to install a VPN on all their devices. The answer is: Cloudflare proxy or reverse proxy.
Using Cloudflare proxy is fairly simple, you register a domain name, change the NS records to Cloudflare, add A record, turn on proxying, and done! Any traffic hitting your domain goes through Cloudflare’s WAF and DDos mitigation rules. If your service gets attacked, its Cloudflare getting that traffic and not your homelab. You still need to open your firewall, except this time, you only allow Cloudflare endpoints to hit your internal network. So to all the bots and threat actors, your port looks closed from the outside. Of course this brings up privacy problems. Cloudflare is doing a MITM on your traffic, people say “you are letting Cloudflare inspect your traffic so its not a MITM”. Unfortunately, you don’t know what Cloudflare is doing with that traffic and the service is free. You might say: “Its to train their algorithms to protect against threats.” You may be right, but I don’t feel comfortable proxying sensitive homelab services through them.
The next best thing is setup a dedicated reverse proxy in a DMZ. This should be isolated from your internal LAN. From your reverse proxy, you should not be able to access anything else other than the backend. The backend should not have access to anything else other than reverse proxy. This ensures that if the machines get compromised, an attacker cannot perform lateral movement. You should also be running an IPS on the reverse proxy. The issue with running IPS at the edge router is it can’t see inside encrypted traffic. Running IPS on the reverse proxy allows inspection of HTTP traffic after decryption. Your web application should also be running with least previlege, either in a Docker container or as a seperate user. The reverse proxy service should also be running as a non root user. Of course, enable unattended-upgrades for all VMs to keep everything up to date. Docker containers should always be running Watchtower for auto updates.
On the edge router, you should use a random ephermeral port and perform source IP geoblocks. I know, security through obscurity, but these will help reduce bot scans and prevent script kiddies. Not gonna stop a global adversary, but if your threat level is that high, you might want to reconsider exposing services to the internet or even using the internet…
Optimizing Wi-Fi Performance and Security
Wi-Fi is complicated, especially at layer 1. Here is a rant of my knowledge on Wi-Fi and authentication protocols. I was watching a video from Tall Paul Tech about how low bitrates cause lots of congestion, especially on the 2.4GHz spectrum. As we know, in North America, there are 3 nonoverlapping 20Mhz channels on 2.4Ghz(1,6,11). When designing a wireless network, you want the least interference possible for maximum performance.
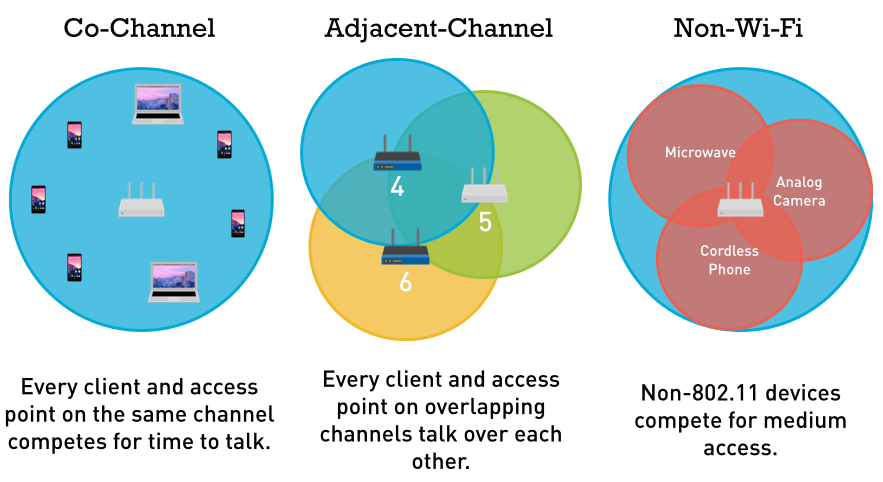
Adjacent channel interference is the worst type because the original signal gets interfered by multiple different sources. Think about being being in a group conversation where everyone was talking at once. Yeah, same scenario in Wi-Fi. We want to completely avoid this. The most common type of interference is cochannel interference. Each AP needs to wait for the other APs to finish transmitting on that same channel in order to transmit(CSMA/CA). Different from CSMA/CD, we need to avoid collisions. This is why Wi-Fi is only half duplex since it needs to wait until the channel is clear before transmitting. Now in the 2.4GHz spectrum, especially in a high density environment, those three overlapping channels are going to get used up quickly. If you put enough APs with low bitrates on the same channel, performance will go to absolute rock bottom as demonstrated by LTT here. The main culprit are beacon frames, transmitted every 102.4ms(usually). So when you open up settings to scan for Wi-Fi networks, your device listens for these beacon frames. Beacons tell your device a lot of info for the AP such as ESSID, BSSID, supported rates, RSN capabilities etc. Your device can also send a broadcast probe request, so all APs in the area will respond. This makes searching Wi-Fi networks a bit faster. Lets take a look at this behaviour in Wireshark.
- Start monitor mode:
airmon-ng start <wifi_interface> - Tune to correct 2.4Ghz 20Mhz channel:
iwconfig <wifi_interface> channel <num> - Open Wireshark, select correct interface, add filter
wlan.fc.type_subtype == 0x0008for beacons only
Remember that the airwaves don’t just carry data, but also management frames. Just like with Data/QoS frames, the AP must wait until the channel is clear to transmit the frame. Notice how the duration for these beacon frames are different. Some are 2000us and some are only 300us. This is due to the different data rates. In order for the AP to support the maximum devices and for the most devices to “hear” the AP, all broadcast frames will be sent with the minimum bitrate the AP supports. This allows legacy devices such as printers to connect to the network. The issue is that these lower bitrates also mean more time spent hogging the channel.
Setting up EAP-TLS with FreeRADIUS
WPA2-PSK and WPA3-PSK is the standard for personal WLANs. Enterprises typically use WPA2-Enterprise with outer EAP with TLS 1.2 and MSCHAPv2 inner authentication, not secure enough for my tastes. Lets setup overkill wifi authentication with WPA3-Enterprise 192 bit security with EAP-TLS for my personal use.
The issue with PSK authentication and even MSCHAPv2 is the transfer of a hashed password that can be captured from nearby attackers and cracked offline. The dragonfly handshake in WPA3 fixes this issue, but it opens up side channel attacks. Take a look at the DragonBlood attack. Of course with a more secure authentication mechanism, we require much more complicated setup. EAP-TLS removes passwords entirely and uses PKI for authentication. The supplicant(client) provides a certificate to the authenticator(access point), which verifies credentials with the authentication server(RADIUS server).
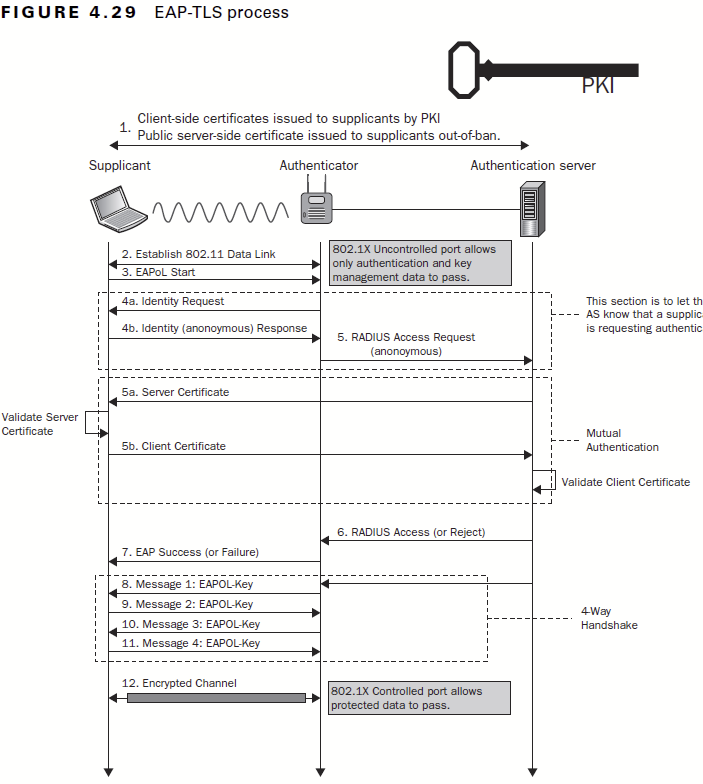
The flowchart shows the information sent. The EAP parameters are sent in the clear such as anonymous identity(identities which RADIUS server to use), version etc. Next is the outer TLS 1.2 handshake. Most APs use 1.2, 1.3 has limited support. The inner authentication is sent over this TLS channel. With PEAP, the endpoint can optionally set a CA certificate to verify the trust chain. This prevents attackers from spoofing the authentication server. In my experience, if the server certificate changes, the endpoint will simply prompt the user to verify certificates and connect. The attacker can easily make a fake certificate trust chain with identical naming to trick the majority of users to accepting an attacker certificate. Because the inner authentication(MSCHAPv2) is sent inside the tunnel, this allows the attacker to capture the hashed password.
MSCHAPv2 is much better than PAP because the APs mutually authenticate the endpoint without sending credentials in the clear. Of course if a weak password is used, the attacker can brute force the hash offline. This is why you MUST USE A LONG, ALPHANUMERIC, SPECIAL CHARACTER PASSWORD!!! Here is what I captured on a PEAP WPA2-Enterprise network using monitor mode:
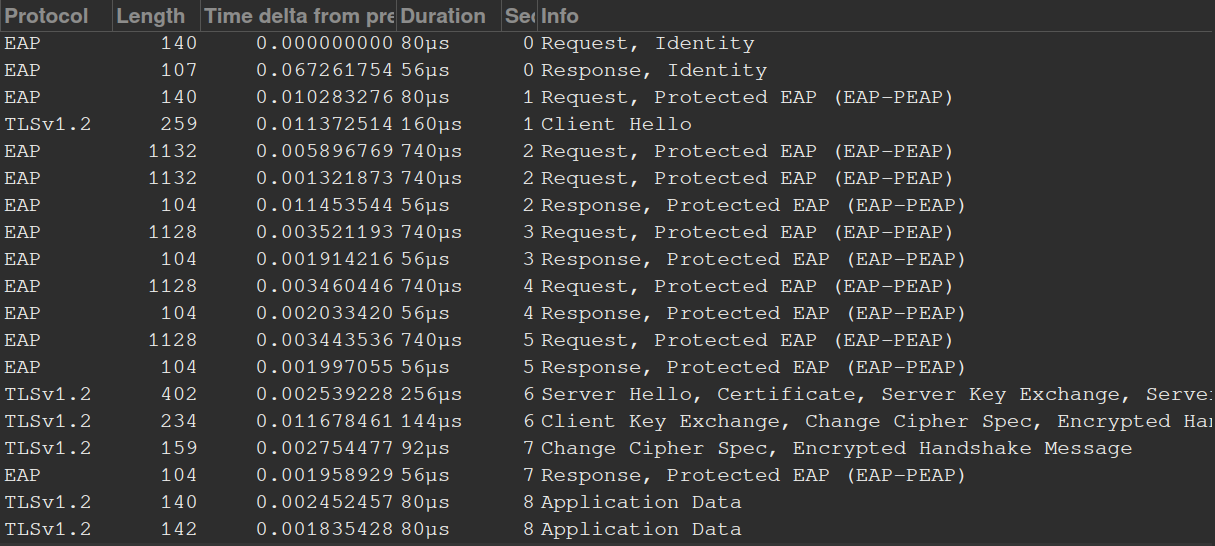
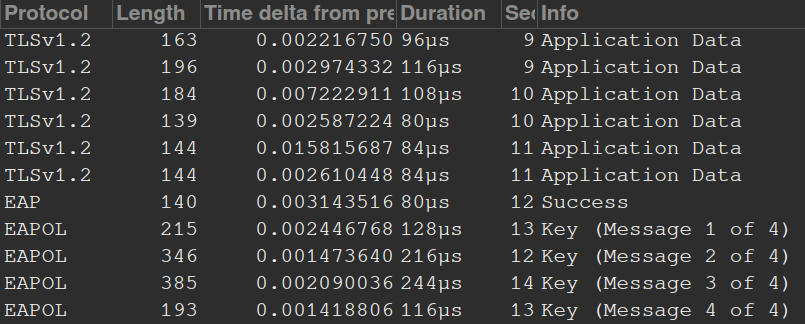
The first 2 packets send the anonymous identity to the AP. Then there is a bunch of EAP packets telling the AP what version to use, stuff like that. Next is the TLS handshake. We see the client hello without an SNI and server hello. Application data is transferred(inner authentication), finally AP replies with EAP success. The standard 4 way handshake is send between the client and AP to establish a secure layer 1 link. Interesting… I initially thought the 4 way handshake was sent inside the TLS tunnel, guess not.
Now with WPA3, a new unique key is used for every handshake. This prevents offline bruteforce attacks and forces the attacker to be within range to have any chance of cracking the password. In addition, even if the password is cracked, previous communications cannot be decrypted due to SAE’s forward secrecy. WPA3 also forces Protected Management Frames(PMF), so this prevents deauth attacks and forging malicious management frames. EAP-TLS solves all previous issues with PEAP. No hashed passwords are transmitted. Client ALWAYS verifies the server certificate, user cannot accept a forged server certificate. The “only way” to compromise EAP-TLS is to compromise the private key of the server and perform a Evil twin attack. EAP-TLS has no known vulnerabilities at the moment.
Alright enough prereq, lets begin setting up WPA3-Enterprise 192bit with EAP-TLS. Installing FreeRADIUS is easy, use your distro’s package manager. Configuration, oh boy. The first thing is setup my test environment. I used the program eapol_test provided in the wpa_supplicant package. I created a test file for EAP-TLS:
network={
  ssid="yourssid"
  key_mgmt=WPA-EAP
  eap=TLS
  identity="youridentity"
  ca_cert="ca.pem"
  client_cert="client.pem"
  private_key="client.pem"
  private_key_passwd="password"
}
Define the parameters you want. When you want to test the RADIUS server, simply call: eapol_test -c /path/to/your/testfile. Configuration files are stored in /etc/freeradius/3.0. Certificates are stored in /etc/freeradius/3.0/certs. You want to establish a basic PKI first. I am not using MDM, so I will simply manually generate each client cert when I need to and manually upload it to the device. For each client, change revelant options such as email, common name in client.cnf to match the target device.
- In
/etc/freeradius/3.0/certs, editca.cnf,server.cnf, andclient.cnf. - For
ca.cnf, under[certificate_authority]change the parameters to your requirments such as common name, email, etc. - Repeat for
server.cnfandclient.cnf, under the respective[server]and[client]. - Run
make. This will generate all the required certificates, private keys etc.Note: If you just want testing certs, you can directly run
makein thecertdirectory without changing anything - Edit the
/etc/freeradius/mods-enabled/eapfile.default_eap_type = tls, uncomment all insecure inner authentication options such aspap,gtc, undertls-config tls-commonset the paths to your certificates and private keys. Make sure the password you defined in theserver.cnffile matches. - In
/etc/freeradius/sites-enabled/defaultunderauthenticate, comment out everything except foreap. - Start FreeRADIUS in debug mode with
freeradius -X